2014-09-01 20:33:26 : Adding thumbnail.
»
Find be368cc39244127783bf5c84f075ffd7e42205fb on GitHub.
Adding thumbnail.
title: Infra-Red LED Throwies
summary: Use an ordinary remote control to blink LED throwies on and off.
date: 2012-08-16 10:54:13
{+thumbnail: ir_throwie.jpg+}
tags:
- IR Throwies
track: True
2013-01-29 18:51:46 : What hast thou persisted? Be gone.
»
Find a7bf49012393eb9e442a26ffa7a80270937f810f on GitHub.
What hast thou persisted? Be gone.
date: 2012-08-16 10:54:13
tags:
- IR Throwies
{+track: True+}
---
{% mark excerpt %}
I've been toying with with ideas for a quick, easy, scalable project for a large group of teenagers to do together for the Boston [ICA's](http://icaboston.org) Teen Night.
2013-01-11 00:03:11 : More header spacing.
»
Find 64065b1f3f4ada6bef7b0a22337db4583e1d4b8e on GitHub.
More header spacing.
tags:
- IR Throwies
---
{+{% mark excerpt %}+}
I've been toying with with ideas for a quick, easy, scalable project for a large group of teenagers to do together for the Boston [ICA's](http://icaboston.org) Teen Night.
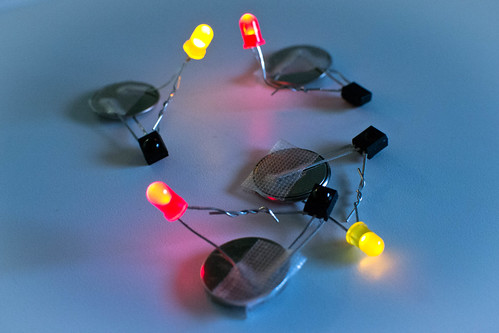
I've always really liked the little [LED Throwies](http://www.instructables.com/id/LED-Throwies/) from the fine people over at [Graffiti Research Lab](http://graffitiresearchlab.com/), *so* here's an updated version that allows for the little guys to be controlled by a regular old remote control. It's a little startling how simple the whole operation is.
{+{% endmark %}+}
{{ macros.render_figure('<a href="http://www.flickr.com/photos/40358770@N00/7735310028/" title="DSC_0203 by s_jacoby, on Flickr"><img src="http://farm9.staticflickr.com/8287/7735310028_7885198dbc.jpg" width="500" height="333" alt="DSC_0203"></a>', "Looking alright.") }}
2012-12-05 12:22:04 : Typo.
»
Find cb5a4b1f6d8f89d3ebe8f0e71703b0d47f60761f on GitHub.
Typo.
{{ macros.render_figure('<a href="http://www.flickr.com/photos/40358770@N00/7735310028/" title="DSC_0203 by s_jacoby, on Flickr"><img src="http://farm9.staticflickr.com/8287/7735310028_7885198dbc.jpg" width="500" height="333" alt="DSC_0203"></a>', "Looking alright.") }}

## [-Materia-]{+Material+}
What we need: not much. If you're interested, I drew up a [PDF hand-out]({{ media_url('files/ir_throwie.pdf') }}) that details some of this.

- CR2032 Battery [[DigiKey](http://www.digikey.com/product-detail/en/CR2032/P189-ND/31939)]
2012-12-05 11:02:03 : Here we go.
»
Find 0680c5b43291800892f8df54996b391d55df4aed on GitHub.
Here we go.
I've always really liked the little [LED Throwies](http://www.instructables.com/id/LED-Throwies/) from the fine people over at [Graffiti Research Lab](http://graffitiresearchlab.com/), *so* here's an updated version that allows for the little guys to be controlled by a regular old remote control. It's a little startling how simple the whole operation is.
[-<figure>-]
[- <a-]{+{{ macros.render_figure('<a+} href="http://www.flickr.com/photos/40358770@N00/7735310028/" title="DSC_0203 by s_jacoby, on Flickr"><img src="http://farm9.staticflickr.com/8287/7735310028_7885198dbc.jpg" width="500" height="333" [-alt="DSC_0203"></a>-]
[- <figcaption>Looking alright.</figcaption>-]
[-</figure>-]{+alt="DSC_0203"></a>', "Looking alright.") }}+}
## [-Materials-]{+Materia+}
What we need: not much. {+If you're interested, I drew up a [PDF hand-out]({{ media_url('files/ir_throwie.pdf') }}) that details some of this.+}
- CR2032 Battery [[DigiKey](http://www.digikey.com/product-detail/en/CR2032/P189-ND/31939)]
This is[-just-] what[-like-] lives inside of millions of watches, all over this fine land. And what keeps the time in your computer accurate, and a bunch of other things. You can get them--for a small fortune--at a drugstore. Someone told me that Ikea was now selling them at close to wholesale prices.
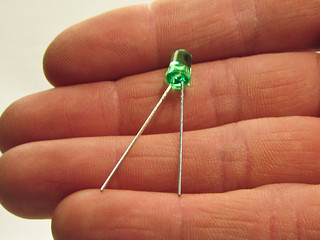
- A Regular LED. [[SparkFun](https://www.sparkfun.com/products/533)][[DigiKey](http://www.digikey.com/product-detail/en/C503B-BCS-CV0Z0461/C503B-BCS-CV0Z0461-ND/1922944)]
@@ -90,3 +86,4 @@ It's like a TV. A one-pixel TV.
2012-10-18 17:13:08 : Clarity + corrections.
»
Find 5de239d6bb6bf5875b4e5d1c4272756a02c1a429 on GitHub.
Clarity + corrections.
## Materials
What we need: not much.[-Well, getting your hands on the IR receivers will be the tricky part:-]
- CR2032 Battery [[DigiKey](http://www.digikey.com/product-detail/en/CR2032/P189-ND/31939)]
@@ -28,7 +28,7 @@ Pretty much anything like this will do. Available at RadioShack, Sparkfun, or wh
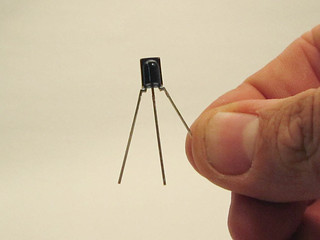
- 38KHz Infrared Receiver [[SparkFun](https://www.sparkfun.com/products/10266)][[Digikey](http://www.digikey.com/scripts/dksearch/dksus.dll?vendor=0&keywords=751-1390-5-ND)]
{+This is what makes the magic happen.+} There are a number of these out there--the frequency, 38KHz, is an industry-standard--so anything like that should work fine. {+This model has worked well for me and I tried a handful.+} These are {+more or less+} the[-same-] little fellows that live inside of your TV, or radio, or anything, really, that's {+IR+} remote-controlled. Look for [-one's-]{+ones+} with three-legs.
- Magnet (optional)
2012-10-18 11:34:18 : Some updates.
»
Find d45e89546040c242160f50b119204215765353a0 on GitHub.
Some updates.
title: Infra-Red LED Throwies
summary: Use an ordinary remote control to blink LED throwies on and off.
date: 2012-08-16 10:54:13
{+tags:+}
{+    - IR Throwies+}
---
I've been toying with with ideas for a quick, easy, scalable project for a large group of teenagers to do together for the Boston [ICA's](http://icaboston.org) Teen Night.
2012-10-09 11:20:30 : Before.
»
Find 8e0bdd626ed13c0ef94c868b0368d84d84a6611c on GitHub.
Before.
I've always really liked the little [LED Throwies](http://www.instructables.com/id/LED-Throwies/) from the fine people over at [Graffiti Research Lab](http://graffitiresearchlab.com/), *so* here's an updated version that allows for the little guys to be controlled by a regular old remote control. It's a little startling how simple the whole operation is.

{+<figure>+}
{+    <a href="http://www.flickr.com/photos/40358770@N00/7735310028/" title="DSC_0203 by s_jacoby, on Flickr"><img src="http://farm9.staticflickr.com/8287/7735310028_7885198dbc.jpg" width="500" height="333" alt="DSC_0203"></a>+}
{+    <figcaption>Looking alright.</figcaption>+}
{+</figure>+}


## Materials
What we need: not much. Well, getting your hands on the IR receivers will be the tricky part:
2012-10-02 11:00:39 : Updated changed flickr photos again.
»
Find c1186ff62c20fc467c6679c74470745d535d5b00 on GitHub.
Updated changed flickr photos again.
Bend the legs of the IR Receiver and of the LED apart, so that they can span the battery easily:
<div>
<section class="side-by-side">
<a href="http://www.flickr.com/photos/40358770@N00/7784243814/" title="IMG_1186 by s_jacoby, on Flickr"><img [-src="http://farm8.staticflickr.com/7261/7784243814_d50463e96a_n.jpg"-]{+src="http://farm8.staticflickr.com/7261/7784243814_f91ef8501e_n.jpg"+} width="320" [-height="296"-]{+height="240"+} alt="IMG_1186"></a>
</section>
<section class="side-by-side">
<a href="http://www.flickr.com/photos/40358770@N00/7784244454/" title="IMG_1199 by s_jacoby, on Flickr"><img src="http://farm9.staticflickr.com/8440/7784244454_31ced29ae5_n.jpg" width="320" height="240" alt="IMG_1199"></a>
2012-10-02 10:58:23 : Updated changed flickr photos.
»
Find 4f81e2375b49edde946840639af373add274b391 on GitHub.
Updated changed flickr photos.
Bend the legs of the IR Receiver and of the LED apart, so that they can span the battery easily:
<div>
<section class="side-by-side">
<a href="http://www.flickr.com/photos/40358770@N00/7784243814/" title="IMG_1186 by s_jacoby, on Flickr"><img [-src="http://farm8.staticflickr.com/7261/7784243814_1d01d1cbe7_m.jpg"-]{+src="http://farm8.staticflickr.com/7261/7784243814_d50463e96a_n.jpg"+} width="320" [-height="240"-]{+height="296"+} alt="IMG_1186"></a>
</section>
<section class="side-by-side">
<a href="http://www.flickr.com/photos/40358770@N00/7784244454/" title="IMG_1199 by s_jacoby, on Flickr"><img [-src="http://farm9.staticflickr.com/8440/7784244454_5b544ae9d1_m.jpg"-]{+src="http://farm9.staticflickr.com/8440/7784244454_31ced29ae5_n.jpg"+} width="320" height="240" alt="IMG_1199"></a>
</section>
</div>
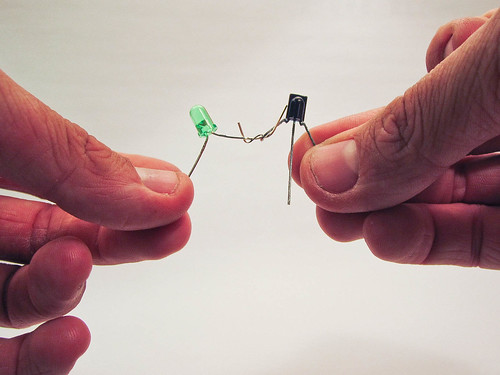
## Step 2
Find the _ground_ pin of LED--the shorter one--and the _out_ pin of the receiver (if you use the same model that I did, it'll be on the left when the "domed" part is facing you), and twist them firmly together. Don't be shy. Twist em'. You can always redo it.
<a href="http://www.flickr.com/photos/40358770@N00/7784245022/" title="IMG_1237 by s_jacoby, on Flickr"><img [-src="http://farm9.staticflickr.com/8435/7784245022_88722103ac.jpg"-]{+src="http://farm9.staticflickr.com/8435/7784245022_467246ebf6.jpg"+} width="500" height="375" alt="IMG_1237"></a>
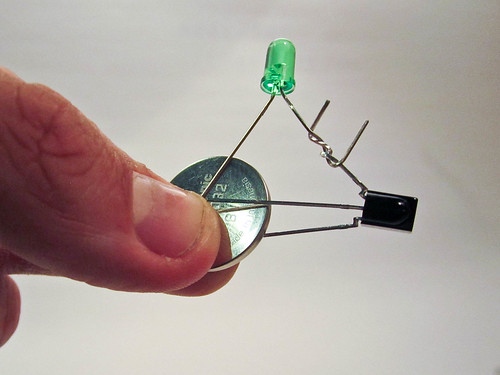
## Step 3
Time to throw that battery in there. That means connecting up the legs, to the *positive (+)* and *negative (-)* sides of the battery. Hold your breath.
2012-09-12 12:51:06 : A variety of things. Mostly, new post on boards.
»
Find f05efe66d5be5aebed18f4af21e6bf3c1ee9e354 on GitHub.
A variety of things. Mostly, new post on boards.
## Materials
What we need: not much. Well, getting your hands on the IR receivers will be the tricky part:

- CR2032 Battery [-[[DigiKey](http://www.digikey.com/scripts/dksearch/dksus.dll?vendor=0&keywords=751-1390-5-ND)]-]{+[[DigiKey](http://www.digikey.com/product-detail/en/CR2032/P189-ND/31939)]+}

This is just what like lives inside of millions of watches, all over this fine land. And what keeps the time in your computer accurate, and a bunch of other things. You can get them--for a small fortune--at a drugstore. Someone told me that Ikea was now selling them at close to wholesale prices.
2012-08-30 09:53:16 : Sarah had some opinions.
»
Find 47654b2540f74149fe0603a5fb62884ba39528bb on GitHub.
Sarah had some opinions.
---
title: Infra-Red LED Throwies
summary: [-Three parts, cost a buck, remote-controlled. As good as TV.-]{+Use an ordinary remote control to blink LED throwies on and off.+}
date: 2012-08-16 10:54:13
---
I've been toying with[-coming up-] with {+ideas for a+} quick, easy, scalable [-projects-]{+project+} for {+a+} large [-groups-]{+group of teenagers+} to do [-together. It had to be something fast--like, minute-fast--and cool. I've always loved the little [LED Throwies](http://www.instructables.com/id/LED-Throwies/) from the fine people over at [Graffiti Research Lab](http://graffitiresearchlab.com/)--and wanted to do a version-]{+together+} for[-a High-Low Tech workshop at-] the Boston [-[ICA](icaboston.org).-]{+[ICA's](http://icaboston.org) Teen Night.+}

[-Here's-]{+I've always really liked+} the {+little [LED Throwies](http://www.instructables.com/id/LED-Throwies/) from the fine people over at [Graffiti Research Lab](http://graffitiresearchlab.com/), *so* here's an+} updated version that allows for the little guys to be controlled by a regular old remote control. It's a little startling how simple the whole operation is.

## Materials
What we need: not much. Well, getting your hands on the IR receivers will be the tricky part:
@@ -14,11 +14,11 @@ What we need: not much. Well, getting your hands on the IR receivers will be the

This is just what like lives inside of millions of watches, all over this fine land. And what keeps the time in your computer accurate, and a bunch of other things. You can get them--for a small fortune--at a drugstore. Someone told me that Ikea was now selling them at close to wholesale prices.

- A Regular LED. [-[[DigiKey](http://www.digikey.com/product-detail/en/C503B-BCS-CV0Z0461/C503B-BCS-CV0Z0461-ND/1922944)]-]{+[[SparkFun](https://www.sparkfun.com/products/533)][[DigiKey](http://www.digikey.com/product-detail/en/C503B-BCS-CV0Z0461/C503B-BCS-CV0Z0461-ND/1922944)]+}

Pretty much anything like this will do. Available at RadioShack, Sparkfun, or wherever fine, finger-friendly electronics are sold.

- 38KHz Infrared Receiver [-[[Digikey](http://www.digikey.com/scripts/dksearch/dksus.dll?vendor=0&keywords=751-1390-5-ND)]-]{+[[SparkFun](https://www.sparkfun.com/products/10266)][[Digikey](http://www.digikey.com/scripts/dksearch/dksus.dll?vendor=0&keywords=751-1390-5-ND)]+}

There are a number of these out there--the frequency, 38KHz, is an industry-standard--so anything like that should work fine. These are the same little fellows that live inside of your TV, or radio, or anything, really, that's remote-controlled. Look for one's with three-legs.
2012-08-23 17:19:58 : Inching closer.
»
Find c74229c010aa09a52b816053ba270ddfaffadfb0 on GitHub.
Inching closer.
---
title: Infra-Red LED Throwies
summary: [-Well, sort've.-]{+Three parts, cost a buck, remote-controlled. As good as TV.+}
date: 2012-08-16 10:54:13
---
I've been toying with coming up with quick, easy, scalable projects for large groups to do together. It had to be something fast--like, minute-fast--and cool. I've always loved the little [LED Throwies](http://www.instructables.com/id/LED-Throwies/) from the fine people over at [Graffiti Research Lab](http://graffitiresearchlab.com/)--and wanted to do a version for a High-Low Tech workshop at the Boston [ICA](icaboston.org).
2012-08-23 10:51:52 : Keep track, dammit
»
Find 4a2af5ccc2de58efdf7c6c937ddf4e6f0c55f3b3 on GitHub.
Keep track, dammit
@@ -0,0 +1,84 @@
{+---+}
{+title: Infra-Red LED Throwies+}
{+summary: Well, sort've. +}
{+date: 2012-08-16 10:54:13+}
{+---+}
{+I've been toying with coming up with quick, easy, scalable projects for large groups to do together. It had to be something fast--like, minute-fast--and cool. I've always loved the little [LED Throwies](http://www.instructables.com/id/LED-Throwies/) from the fine people over at [Graffiti Research Lab](http://graffitiresearchlab.com/)--and wanted to do a version for a High-Low Tech workshop at the Boston [ICA](icaboston.org).+}
{+Here's the updated version that allows for the little guys to be controlled by a regular old remote control. It's a little startling how simple the whole operation is. +}
{+## Materials+}
{+What we need: not much. Well, getting your hands on the IR receivers will be the tricky part:+}
{+- CR2032 Battery [[DigiKey](http://www.digikey.com/scripts/dksearch/dksus.dll?vendor=0&keywords=751-1390-5-ND)]+}
{+This is just what like lives inside of millions of watches, all over this fine land. And what keeps the time in your computer accurate, and a bunch of other things. You can get them--for a small fortune--at a drugstore. Someone told me that Ikea was now selling them at close to wholesale prices.+}
{+- A Regular LED. [[DigiKey](http://www.digikey.com/product-detail/en/C503B-BCS-CV0Z0461/C503B-BCS-CV0Z0461-ND/1922944)]+}
{+Pretty much anything like this will do. Available at RadioShack, Sparkfun, or wherever fine, finger-friendly electronics are sold.+}
{+- 38KHz Infrared Receiver [[Digikey](http://www.digikey.com/scripts/dksearch/dksus.dll?vendor=0&keywords=751-1390-5-ND)]+}
{+There are a number of these out there--the frequency, 38KHz, is an industry-standard--so anything like that should work fine. These are the same little fellows that live inside of your TV, or radio, or anything, really, that's remote-controlled. Look for one's with three-legs. +}
{+- Magnet (optional)+}
{+The 'classic' LED throwie has a magnet, so it can be chucked at anything metal and will stick. Certainly, you can do the same with this. I didn't, but you certainly could. +}
{+- Scotch tape+}
{+For wrapping the whole shebang together.+}
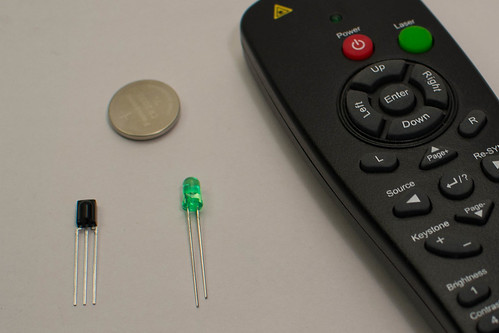
{+- Remote Control+}
{+Any one should do. I just grabbed one for a television that was lying around.+}
{+<a href="http://www.flickr.com/photos/40358770@N00/7784243140/" title="DSC_0333 by s_jacoby, on Flickr"><img src="http://farm8.staticflickr.com/7127/7784243140_9383a38a50.jpg" width="500" height="333" alt="DSC_0333"></a>+}
{+## Step 1+}
{+Bend the legs of the IR Receiver and of the LED apart, so that they can span the battery easily:+}
{+<div>+}
{+ <section class="side-by-side">+}
{+ <a href="http://www.flickr.com/photos/40358770@N00/7784243814/" title="IMG_1186 by s_jacoby, on Flickr"><img src="http://farm8.staticflickr.com/7261/7784243814_1d01d1cbe7_m.jpg" width="320" height="240" alt="IMG_1186"></a>+}
{+ </section>+}
{+ <section class="side-by-side">+}
{+ <a href="http://www.flickr.com/photos/40358770@N00/7784244454/" title="IMG_1199 by s_jacoby, on Flickr"><img src="http://farm9.staticflickr.com/8440/7784244454_5b544ae9d1_m.jpg" width="320" height="240" alt="IMG_1199"></a>+}
{+ </section>+}
{+</div>+}
{+## Step 2+}
{+Find the _ground_ pin of LED--the shorter one--and the _out_ pin of the receiver (if you use the same model that I did, it'll be on the left when the "domed" part is facing you), and twist them firmly together. Don't be shy. Twist em'. You can always redo it. +}
{+<a href="http://www.flickr.com/photos/40358770@N00/7784245022/" title="IMG_1237 by s_jacoby, on Flickr"><img src="http://farm9.staticflickr.com/8435/7784245022_88722103ac.jpg" width="500" height="375" alt="IMG_1237"></a>+}
{+## Step 3+}
{+Time to throw that battery in there. That means connecting up the legs, to the *positive (+)* and *negative (-)* sides of the battery. Hold your breath.+}
{+The *postitive (+)* lead of the LED--that is, the long one--and the *positive (+)* lead of the receiver--the one on the middle--should touch the *positive (+)* side of the battery. There should be a user-friendly *+* on the battery to help you out with that, but you shouldn't burn anything if you do it wrong. +}
{+<a href="http://www.flickr.com/photos/40358770@N00/7784245772/" title="IMG_1250 by s_jacoby, on Flickr"><img src="http://farm9.staticflickr.com/8298/7784245772_92aac85b3d.jpg" width="500" height="375" alt="IMG_1250"></a>+}
{+ Something, of course, needs to head to the back of the battery, to the *minus (-)* side to complete the circuit. Both legs of the LED are busy--so take the free leg of the IR Receiver--the on the far right--and bend it around to the back and hold it against the battery. Make sure that it doesn't make contact with anything else. +}
{+ Hold that sucker tight with your fingers. You're pretty much done. If you've got a remote handy, now's the time to point it at your gizmo and press a button to make sure you've got it figured right. **Good**? +}
{+ +}
{+### Trouble?+}
{+ +}
{+Nothing works for the first time. That's just a rule. +}
{+ Try a couple buttons if the first one doesn't seem to work--depending on the remote, some modes might be disabled (say, TV guide buttons when you're in cable-mode) and your remote won't be firing. Then check that all of your leads (legs) are doing what you think they're doing and connected where you think they're connected, and that you haven't inadvertantly shorted anything--say, across the lip of the battery.+}
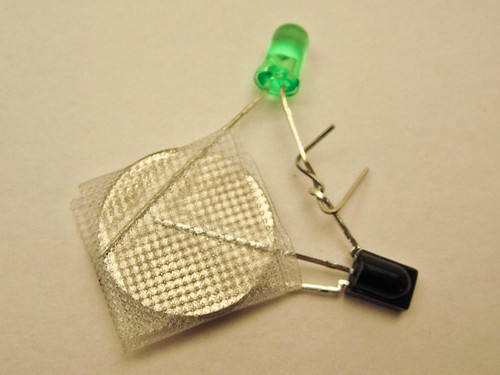
{+Once you feel good about the operation, wrap it all up in tape -- and you're ready to throw-in a magnet, integrate it into a project, or whatever. It starts getting really good when you put together a couple hundred of these, which will all blink synchronously when you fire off. +}
{+<a href="http://www.flickr.com/photos/40358770@N00/7784246988/" title="IMG_1293 by s_jacoby, on Flickr"><img src="http://farm9.staticflickr.com/8446/7784246988_26ecbed8db.jpg" width="500" height="375" alt="IMG_1293"></a>+}
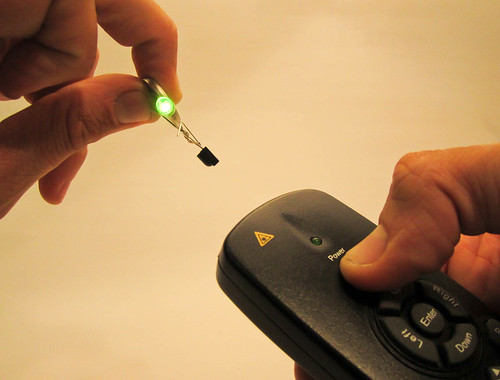
{+## Step 4 // Rejoice.+}
{+It's like a TV. A one-pixel TV.+}
{+<a href="http://www.flickr.com/photos/40358770@N00/7784247614/" title="IMG_1262 by s_jacoby, on Flickr"><img src="http://farm9.staticflickr.com/8283/7784247614_41aa4e6f8c.jpg" width="500" height="380" alt="IMG_1262"></a>+}